Friday, September 08, 2006
Blogger Hack: Create Categories in your Blog
The lack of categories is one of the most glaring omissions in Blogger's functionality, but luckily there are a few lines of code you can put in your blog's template to manually create categories. The downside is that it is time-consuming because you have to manually enter links to your posts into the template each time you want to update your categories. [Thanks to A Consuming Experience]. If you want a faster, but less elegant, method, skip to the bottom.
Example:
Two code segments need to be inserted into your blog template. The first doesn't need to be modified. Just insert it. I inserted it just before the </head> tag. You can quickly find the </head> tag by using your browser's find function. (The code needs to be somewhere between <head> and </head>)
First segment:
<style type="text/css">
.texthidden {display:inline}
.shown {display:block}
</style>
<script type="text/javascript">
document.write('<style>.texthidden {display:none} </style>');
</script>
<script type="text/Javascript">
function expandcollapse (postid) {
whichpost = document.getElementById(postid);
if (whichpost.className=="shown") {
whichpost.className="texthidden";
}
else {
whichpost.className="shown";
}
}
</script>
The second segment you can put anywhere in your sidebar (insert it anywhere after you see <div id="sideBar">). I chose to put it after the blog member profile tag (<$BlogMemberProfile$>).
Here's the second segment with sample code:
<div style="width:100%; text-align:left;">
<h6><p><li>Categories</li></h6>
<li>
<ul><a href="javascript:void(0);" onclick="expandcollapse('gmail')"> [+/-] Gmail Hacks</a></ul>
<ul class="texthidden" id="gmail">
<li><a href="http://21st.blogspot.com/2006/09/use-gmail-generate-unlimited-e-mail.html">Use Gmail Generate Unlimited E-mail Addresses</a></li>
<li><a href="http://21st.blogspot.com/2006/09/make-gmail-your-default-e-mail-program.html">Make Gmail your Default E-mail Program</a></li>
</ul>
</li>
</style></div></p>
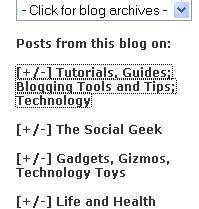
See the result on my sidebar. The important parts are highlighted. For the words highlighted in red, just insert a descriptive word or phrase. The part in blue is what people see as your category title. The part in purple is the link to your post, and the part in green is the post title. To create more categories just copy the middle section of the code (between <h6><p><li>Categories</li></h6> and </style></div></p>) and replace the text.
A less elegant, but faster, option: Use del.icio.us to tag your posts and insert links to your tags into your sidebar. Your tags will just be your categories. Create a new section, "Categories", in your sidebar and place your del.icio.us tag links there. It doesn't look as nice, but it saves you from needing to go into your template every time a new post needs to be categorized.
Technorati Tags:
Labels: Technology


